 I saw this over on Dawn blog and followed her tutorial, here is the link she gave for the original directions: http://dawnmercedes.blogspot.com/2007/10/skittle-purse-tutorial.html I filled mine with cherry candy instead of the skittles. They were easy, except if you don't like using the coluzzle. I know some people have trouble with it, but I found the more I used it, the easier it got. I still love the tart and tangy designer paper the most. I just got my SU orders today and the new Holiday Treasures is really nice, but T&T is still the best! I also am the proud owner of the square punches. I am trying to resist buying paper and stamps so I can add to my punch collection. The new Holiday mini is driving me crazy as there is so much in there I like! I want to try a SU diecut next order. I have a cuttlebug and I want to see for myself how well it will work in it. I saved the thread that told how to use them in the CB, if I can only find it again in under my favorites. I need to spend a day going over all the stuff under my favorites and organize it. It seems I'm always in a hurry so I just click and go. Have a great day!
Candy Purse
I saw this over on Dawn blog and followed her tutorial, here is the link she gave for the original directions: http://dawnmercedes.blogspot.com/2007/10/skittle-purse-tutorial.html I filled mine with cherry candy instead of the skittles. They were easy, except if you don't like using the coluzzle. I know some people have trouble with it, but I found the more I used it, the easier it got. I still love the tart and tangy designer paper the most. I just got my SU orders today and the new Holiday Treasures is really nice, but T&T is still the best! I also am the proud owner of the square punches. I am trying to resist buying paper and stamps so I can add to my punch collection. The new Holiday mini is driving me crazy as there is so much in there I like! I want to try a SU diecut next order. I have a cuttlebug and I want to see for myself how well it will work in it. I saved the thread that told how to use them in the CB, if I can only find it again in under my favorites. I need to spend a day going over all the stuff under my favorites and organize it. It seems I'm always in a hurry so I just click and go. Have a great day!Purse directions
Hi! I've had several requests for the purse template. I don't have the scanner hooked up to my laptop yet, I will try to find some time this weekend to do that. Then I will try to figure out how to post it here. I'm new to all of this computer stuff so it may take awhile! I have the directions too, so I will post those at the same time. Hopefully soon!
Holiday 3x3 card

I finally broke out my riding hood red ribbon for this 3x3 card! I like to make my own Christmas gift tags and cards, so I thought I better get started earlier this year. I was doing them as I wrapped presents last Christmas and it got a little overwhelming. For these I used riding hood red, artichoke, and vanilla. I used the tearing edge tool on two sides of the red paper. I got that at a rummage sale this past summer and haven't used it much yet. I like the look and think I will be using it a lot. Using black ink, I stamped the sentiment from Sketch It {retired SU} on vanilla. Then I "stamped off" the needles stamp from Peaceful Wishes with artichoke ink on top and attached two brads. The ribbon is tied under the sentiment. The colors work well together, so I may make some 3x3 card sets using them to give as gifts.
Beautiful Fall Weekend on the North Shore!

.jpg)

Brent and I headed to Duluth for a few days and it was a perfect weekend! We got to visit with the bartender one night{photo below}, have dinner with friends at Little Angies, hike at Gooseberry, stop at Betty's for pie, shop, watch the game at Grizzleys with our son, and take long walks around town. It had really rained the night before we headed to the falls, and as you can see, it was really flowing! I've been to the North Shore a million times, but never tire of it. I really like the fall and all the colors!


Candy Jar

What kind of candy is in your candy jar? I have a thing for candy corn, especially mixed with peanuts but before I know it, the bag is gone. I needed some to decorate some cookies I'm making and figured if I used the rest for a gift I would stay out of them! So I put them in this jar from Wally's and added some purple ribbon with a kiwi kiss scallop circle,eggplant circle and orange circle with the sentiment" Trick or Treat "on it. I used a purple eyelet and tied it on with a gold string. Now all I have to do is decide which lucky soul will get this!
Halloween Treat Purse
 I can't stop! Here is another treat purse made with Halloween patterned paper. I used the studio g stamp and stamped with stazon ink. Then I colored the pumpkin with my pumpkin pie marker and put crystal effects on it. And you guessed it...there is candy corn inside! {I will try to post the template as soon as I get my scanner running} Look under Oct.5th post.
Treat Purse
 These are adorable! I made one at an SU workshop at JaNells and Yvonnes{SU demonstrators} not too long ago. I liked it so much I made some more for fall. I used pumpkin pie paper,tart and tangy and last years designer paper for these. The ribbon is old olive. I filled the bags {which I found at Wally's} with m&m's. If you like purses there is a whole gallery at http://splitcoaststampers.com/. Have a great weekend! {I will try to post the template as soon as I get my scanner running.} Update:Look under Oct.5th post.
Peaceful Wishes
 When I first saw this card that SU demonstrator Holly {http://hollysstampinmania.blogspot.com/} made, I knew I had to have this stamp set. We live among the pines up here and I have pine cone curtains, lamps, candles, etc. all over my house! It was a must have. The card is made with SU night of navy and brocade blue. I used white craft ink, chocolate chip, and night of navy. The edges are sponged with the white ink and I also used it with my stipple brush for the snow. I borrowed the sentiment for the inside from Diane. It says "May you have the gift of faith, the blessings of hope, and the peace of His love this Christmas." I sent out quite a few of these last year, but decided to make a few more for this year too. The craft ink I find hard to work with as it gets all over the place including all over me. I smudged several cards last year so this time I was prepared and cleared a large area to work in. I had plenty of wipes for my fingers, too. It takes awhile to dry, but worth the effort because they are even prettier in person!
Snow?
 Snowflakes? No not yet, just trying to get a jump on Christmas cards. I was on a blog the other night and saw some cards made with craft paper and white ink. I thought it looked interesting so of course I had to try it. I started out with SU baja breeze. Then I took a piece of craft paper and put it through the cuttlebug using the snowflake folder. I sponged white craft ink on the snowflakes. That was a little tricky, trying not to get too much. I need to practice that some more. The stamp is from So Many Scallops with a crystal brad in the middle. I had always wanted that stamp set but never ordered it, and lucky me...I found it at a garage sale this summer! The ribbon I found at JoAnn's is a perfect match to the baja breeze paper. I love it when that happens!
Who stole the cookies from the cookie jar?
 These cookies are awesome! My friend Diane gave me some she had baked and told me I needed to share them with Brent. But they are so chewy and delicious I really think they should be mine. But my mom taught me to share so I guess he can have some. I 'll post the recipe below. But if they are gone...you know who ate the cookies from the cookie jar!
Oatmeal Cookies
1c. Crisco
1 c. brown sugar
1/2 c. sugar
2 eggs
1 tsp.vanilla
1 1/2 c. flour
1 tsp. baking soda
1 tsp.cinnamon
1/2 tsp salt
3 c. old fashioned Quaker oats
1 c. raisins
Mix and drop onto ungreased cookie sheets,bake
at 350 10-12 min. cool 1 min. on cookie sheet, then remove
to wire racks. Makes 4 dozen yummy cookies.
Mmmm...Apple cake

Good Morning! Last night I made some low fat Apple Cake with Caramel Sauce for dessert. It's hard to believe it's so low in calories. I enjoy baking with apples, it makes the whole house smell so good! For the recipe page I started with real red and added some tart and tangy designer paper. The recipe is on white with some real red behind it. The scallop circle is punched from old olive paper, and under it is some red checkered ribbon. Another favorite apple recipe of mine is the Snicker Bar Salad. The other day I was in the local grocery store and they were giving out samples of Candy Bar Pear Salad, which is similar. It reminded me of the Snicker salad with a different twist. It was awesome! {To make both a little lighter you could use light yogurt and sour cream and just add some of the chopped candy bars on top.} Here are both recipes:
Candy Bar Pear salad
3/4 c. vanilla yogurt
1/4 c. sour cream
1 c. red grapes,halved
2 pears, cut in bite size pieces
1 8oz. can crushed pineapple
2 Baby Ruth candy bars,chopped
2 T. flaked coconut
Mix altogether, top with coconut. Makes 10- 1/2c. servings
Snicker Bar Salad
2 Snicker Bars,chopped
3 apples,chopped
Mix 1 package instant vanilla pudding with
1c. milk or buttermilk.Add to apples and snickers.
Fold in 1 8oz. Cool Whip.
 I can't wait for an occasion to make the pear salad,but its too large for just the two of us. I do have a potluck coming up, though. I was going to take No Name brand wild rice meatballs with Famous Dave's sweet and zesty BBQ sauce. I tried that at a recent Taste of Home show and it was soooo good! Maybe I need to make both! Have a great day!
Apple cake with caramel sauce
1c. flour
1c. sugar
1 tsp. baking soda
1 tsp.cinnamon
1/4 tsp. salt
1 egg
2 c. shredded apples
1/4 c. chopped walnuts
Mix and pour in a greased 9" pan and bake at
350 for 25-30 min.
serve with sauce:
1/2 c. brown sugar
2 T. flour
1/8 tsp.salt
Mix and gradually add 1 c. water until it comes
to a boil. Cook 2 min. or until thickened. Add
1 T. butter and 1/4 tsp. vanilla.
serves 9 251 cal. 4 fat 2 fiber
Boo! Criss Cross Box
 Another Halloween project! This is called a criss cross box. The tutorial can be found athttp://nicholeheady.typepad.com/capture_the_moment/2007/12/5.html. I used kiwi kiss paper, stamping Boo! with black stazon ink all over it. The stamps are from Spooky Halloween, a set made by Stampendous. I found it last year at Archivers. I have really used that set alot,as the stamps are so much fun to play around with. I also used orange, eggplant, and some patterned paper from Ben Franklin. I just love the colors of the Halloween m&m's this year. I think they look great in this box. Yesterday when I was out of town at a Weight Watchers workshop, I did a little shopping and came home with another bag of them. I couldn't find them locally, they must have sold out already and I need them for several projects. I didn't find much shopping. I even went to JoAnns, with a coupon, and didn't buy a thing! Don't worry, I have several more opportunities to shop in the next couple of weeks and I'm sure I'll find something then! The workshop was great and afterwards I went out with the" team" to Applebees. I usually order the Grilled Chicken off the WW part of the menu but they didn't have it this time so I chose a salad instead. It was a fun time. The best part of WW is all the great people I have gotten to know!
Wedding


 Here are some photos of the wedding we went to yesterday. The bride is the daughter of one of our old high school friends. Most of my photos didn't turn out so I am kinda bummed about that. It was fun to see everybody again though, as it's been awhile...too long! The wedding was outdoors and it was perfect weather. We were surprised to see who the pastor was...an old neighbor and friend of the family! The bride was beautiful, I have a hard time believing I used to babysit her years ago when her mom went back to work after she was born. I was a stay at home mom back then! The day was fun, I love weddings! When we got home we had an unpleasant surprise. The waterline to our bathroom tank broke and we had a little flood! It took awhile to clean up and dry out but we are thankful there wasn't much damage as we caught it in time. If we ever go away for more than a day you can be sure we will be turning off our water, as we have seen what can happen in just a short amount of time!
Halloween Spooks!
 Hi! How do you like Frank and his friend Mummy? I saw these on Angie's blog and had to try them out. I used miniature Kit Kat bars, but you can also make them using the regular size bars. I started with a 3 x 3 1/2 inch piece of card stock, scoring on the 3 1/2" side at 3/4" and 1 1/8" from each end. For Frank I used old olive with black for the hair. I had no pattern for the hair, just made it up as I cut. The white eyes were punched with the 1/2" circle punch, and the black with 1/8'' circle punch. I just used a black marker for the rest of the face. For Mummy I started with 3 x 3 1/2" piece of creamy caramel scoring at 3/4" and 1 1/6" from each end. I took a 3 x 1 1/8"piece of vanilla and tore it in strips,sponging the edges with creamy caramel ink. I adhered the strips on and punched the eyes using the 1/4" and the 1/8" circle punches. I stuck the eyes in to make them look like they were peeking out. That was it! I'm off and running today, this weekend is so busy! We had a great time at the wedding yesterday...I'll try to post a photo later!
Bella Rose Gift Set is finished!

Good Morning! I finished the bag for the gift set but decided the set was lacking something IMPORTANT. What was it? CHOCOLATE, of course. So I made a quick sleeve for a Hershey bar to tuck inside. For the bag I put some riding hood red paper on the front and added some strips of kiwi kiss and Bella Rose paper. In the middle of the scalloped circle is another red crystal brad. It's done and ready to give!
Bella Rose Gift Set
 Hi! It's Friday already. How did that happen? The week flew by and this weekend will be a busy one. We have a wedding to go to and I have a workshop. Unfortunately not a stamping one, but work related! Brent plans to stain the deck. Maybe I can still sneak some stamping in somewhere! Well, I decided to add to the card I posted yesterday and turn this into a gift set. I found a white candle and adhered some of the Bella Rose designer paper to it. Then I tied some of the kiwi kiss satin ribbon around it. Now I need a bag...maybe you will see it on tomorrows post!
Wishing You Happiness
 Good Morning! Since my SU order came in I have been playing with the new papers. This is another 5x5" card made with riding hood red, kiwi kiss, and the bella rose designer paper. I used the rectangular nestabilities and my new scallop edge punch. The center is a kiwi kiss scalloped circle with a prima flower and a red crystal brad in the middle. Underneath is some kiwi kiss satin ribbon. I stamped the sentiment from the Heard from the Heart set with stazon black ink. It's so much fun to use the new in-colors. I thought I would really miss the old ones, especially the purely pomegranate, but so far I am really liking these!
Fun Night!
 Look at all the cards we made the other night at JaNell's and Yvonne's workshop! {SU demonstrators} It was alot of fun using the new SU ribbons, papers, and stamps. On the Thanksgiving card we had to use a brayer and a wheel to make the orange color on the bottom. I am not fond of the brayer but I have to admit this wasn't too bad. Last time I used a brayer I was not very successful. Yvonne showed us how to put the silver cord over the circle scallop on the snowflake card. It was a little tricky but doesn't it look great? The 2 pink cards have a similar layout. Everyone really liked the regal rose ribbon! The little pillow box was a gift to each of us with some of the NEW cherry m&m's inside. It is SO hard to find those m&m's around here. Everywhere I go shopping I look for them. I did find some at a local restaurant this summer, but when we came back they were all sold out. So if you see me searching the candy isles, you know what I am after!
Halloween Candy Bag
 Hello! What another great day! We're having some really nice fall weather up here. The leaves are just starting to change and in a few weeks it will be just beautiful. I really love fall but then there are all those leaves to rake too! Good thing my hubby likes to rake because after a few piles I'm done! I'm still working on my October care packages for my kids. I came up with this bag topper over the weekend. I used kiwi kiss, eggplant, and orange paper with black stazon ink. The stamp is a from a set my daughter and her boyfriend gave me for Christmas last year that they got at Michaels. I attached a tab punch with an eggplant word window punch on it, added a button, and some, yes, once again, my fave, the kiwi kiss ribbon. I'll try to open my riding hood red ribbon soon and give it a go, as you are probably tired of the kiwi on every post. I seem to be stuck on it I know. I really like the new in-colors, not just the kiwi kiss. Some of us are trying clear ink spots inked up with reinkers in the new in-colors. I just got mine but haven't had time to try them out. I'll let you know how they work!
Cricut 6x6" recipe page
 Good Morning! Here is a recipe page I promised I would work on over the weekend. This is a new recipe tested on hubby. He can smell a dessert miles away. He loved this one! I am always on the look out for recipes that are lower in fat and calories with a decent size portion. Why is it certain recipes seem like fall when you can make them year round? To me this is a fall tasting recipe, almost like a ginger bread cake. It does have ginger in it but the flavor is more molasses. With a dollop of lite cool whip it's a great treat!{ I used Blue Bonnet lite margarine and it serves 9.} For the page I started out with chocolate chip paper,creamy caramel,and white. I stamped the leaf with choc. chip ink from the retired Sew Seasonal set. I added {of course} my new ribbon love, kiwi kiss satin, and some leaves cut from the cricut. A tab punched out of kiwi kiss paper with a button adhered at the top, and it was done! I am looking out at the lake right now, it's so peaceful, just a few ducks floating by. It looks like it will be a great fall day! Have a good one!
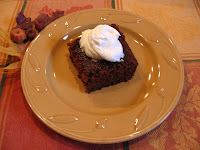
New Halloween m&m colors
 Guess what! The new m&m colors have a green that is a close match to kiwi kiss! I found this jar at Wally's the other day and thought it would be the right size to store some of my buttons in. But since I'm tying ribbon on everything, I put it on the jar. Then I noticed the m&ms laying there and also a scallop left over from my clippies and here you have it! A nice gift for a fall Birthday.
Smells good!
 Look what I made today! There's nothing better then the smell of fresh baked bread. I would post the recipe but I don't actually know the correct amount of flour. It's a recipe handed down from my Grandma that I learned to make at home. It's a dark yeast bread made with molasses and 3 kinds of flour. I always think of my mom when I make this! Next time I make it I'll try to get the correct measurements and post it.
Kiwi Kiss candle
 Good Morning everyone! Just got back from church and it's chilly out there! It's also raining and grey out. I was hoping for a little sun so I could take some more pictures of the stuff I made yesterday. It seems they turn out better when the sun is shining through the window {even though I use the flash.} But here is a photo of a fall candle I put together. I just used Zots to adhere the kiwi kiss ribbon around the top and tied on the circle with a shiny leaf gem attached to it. I am putting that ribbon an everything I get my hands on! I told you it's awesome! Pretty simple but makes a nice little gift. I wanted to finish telling you about this clip I posted last night.{ By the way the movie was not that great, but hubby liked it!}
 Somebody asked me what you use this for. You can slip a favorite photo or a recipe behind the scallop. I plan to make some for recipe holders so I will post some with the recipe card on it. For this I used the urban garden paper for the base of the clip. I punched out the scallop from some of the urban garden and added a kiwi kiss circle. The center is a smaller circle punched out of urban garden with a silver brad in the middle. I used Think Happy Thoughts to stamp in not quite navy for the sentiment. And the ribbon, of course I tied on some kiwi kiss ribbon! Well I'm off to stamp some more, I'll be back with a later post. Have a fun afternoon!
Kiwi kiss
 Wow! I love the SU urban garden paper! It has a great combination of colors. Green is my favorite color and kiwi kiss is awesome. It may replace my love of old olive, but I said MAY. One can never use too much old olive. The kiwi kiss satin ribbon is sooo soft and sooo pretty! I have already used half a roll of the ribbon so I better reorder more because I don't feel I can not have it on hand. Panic! This could be a problem when they replace the in-colors again. I suppose I will have to start stock piling. I wonder if SU will add more colors of satin ribbon in the future. It is so nice to work with. On to the card. This is a 5x5 size card. Now I know some of you do not appreciate this size because of having to buy special envelopes and added mail costs, but it really is a fun size to work with. You already know I used urban garden and kiwi kiss paper. There is also some not quite navy on the card which I was never to crazy about but now have a new appreciation for. It looks so great with kiwi kiss. I cut out the flowers from the urban garden and attached some pearl beads in the center with crystal effects. I used a pencil to curve the petals to give it more dimension. The sentiment is from Upsa Daisy stamped in not quite navy. I have to watch a movie with hubby now so I will post more about the clip tomorrow. It's called "Street Kings." Sounds like a guy movie. Last Saturday I picked out "21" and we both liked it. That doesn't happen too often! I really had alot of fun stamping today and can't wait to show you my projects this week!
Halloween Post It note and rsvp pen 2
 Hi! Today I'm posting another Post It note and pen. I had some black Post It notes and was wondering what to do with them when I came up with this. I used a chipboard coaster and covered it with some patterned paper, sanding the edges. I also covered the clip with the same paper. Then I tied on some old olive and pumpkin pie ribbon. Using some sticky foam tape, I adhered the scalloped circle to the clip. I used my spooky Halloween stamp set from Stampendous and the dollar clear stamps from Michaels on the pumpkin pie circle. The only problem is I can't find a white ink rsvp pen for the black paper. I may have to use a white marker. I am off to stamp today, I will post a new card later, so check back!
Halloween Post It note
 Hi! It's Friday! My favorite day of the week. Fridays mean the weekend is near and I'll have more time to stamp! I just got my SU orders and am anxious to play. I did sneak in a card last night while I was watching TV. All I can say is I absolutely LOVE the new satin kiwi kiss/very vanilla ribbon. It's really stunning on a card. Hopefully I'll get alot done and be able to post some things with my new goodies soon. Today's post is a Post-it note made with another chipboard coaster. For this one I adhered some Halloween printed paper to the coaster, sanded the edges , and then put the same paper on the clip. I used a piece of sticky foam tape to adhere my scallop circle dimensional to the clip. The stamps I used for the sentiments are Stampendous Spooky Halloween and Studio g. Then I tied on some pumpkin pie and old olive ribbon. The rsvp pen also has the same patterned paper inside. Remember, you can find tutorials for both of these at http://splitcoaststampers.com/ under resources. Happy Friday!
3x3 envelope note card

 Hi! Aren't these a great idea? I found them at Angie's blog. I used a 3x3 SU envelope and pushed the flap inside.I attached a 3 1/8" by 2" piece of designer paper and added the wasabi green ribbon. The inside piece is a 3x3 of certainly celery with a 2 7/8" by 2 7/8" white, adhered together. I punched a certainly celery flower with my SU flower punch and attached it to the white piece with a silver brad before I glued it to the celery paper. I like tiny things and this is so cute! I've had some requests for more 6x6 recipe pages so I hope to get some done this weekend. I have an on-going list of things I want to make.....so much to do....so little time....have a great day!
September Card Club
 Here are the cards we made last night! The dress card was made by Mona. We all went nuts over this at our table! It's so cute! It was a little tricky folding the skirt, but well worth the effort. The buckle is a pop tab with ribbon pulled through for a belt on the dress. I forgot to put on the little brad buttons! They went down the v neckline. The next card is the one that I made. I cased it from Angie's blog! The paper and ink used are purely pomegranate,chocolate chip, and pretty in pink. For the ice-cream you cut the scallop circle so there are only 6 scallops left at the bottom. I used my score-pal to emboss the lines for the cone.
 The zoo card was made by Deb. It's so cute! She had embossed the animals so all we had to do was cut them out. When you open the gate is says"It's a zoo without you." The green background is embossed with a cuttlebug folder. The wiggly eyes really add expression to the animals. The next card Mary made. We really liked the fold on this one! You can't tell from this photo, but the blue tab fits into a slit on the side made with the SU slit punch. The patterned paper wasn't vellum but was very thin like tissue paper almost. I forgot to ask her what it was called. I really like the color combination, pretty card! The dinosaur card was made by Peg. It's adorable! She had them cut out for us so we just sponged the color on, added a black eyelet for the eye, and glued the spots on. We used a spectrum color pad for the sentiment. It really makes it pop! As usual, all the cards were awesome and we are already looking forward to next month!
Yum!
Card Club was lots of fun last night, as usual, and we made some great cards. I hope to get them posted soon! I had asked my friend Peg for her recipe for caramels and last night she gave me this:
I love how she decorated the box with fall paper, and I especially LOVE the caramels! They are awesome! Thanks so much!
2 c. butter
2 lbs. brown sugar
2 c. white Karo syrup
2 cans sweetened condensed milk
1 T. vanilla
Melt the butter,add sugar,stir well. Let bubble up then add syrup and milk. Cook to 238 ,watch closely so it doesn't scorch-stir constantly! Have a buttered jelly roll pan ready to pour caramels into. Let cool over night before cutting. No need to cover. Makes 5 lbs. of delicious caramels!
Halloween Clippies
 Hello! Here are some Halloween clippies I made the other night. I used my cuttlebug to cut some chipboard circles to mount my scalloped circle and skeleton on for added support. I used E600 adhesive. The pumpkin I cut with my cricut and just used sticky foam tape to attach it to the clip. When they were dry {it takes awhile for the E600 to set} I tied some ribbon on each one. I plan to clip one on to a scary novel for a friends Birthday. I'm also sending some favorite fall recipes to a friend clipped together with the pumpkin clip. They would be fun to clip onto children's Halloween books, too. Hey! I think I'll put them in my kids care packages next month clipped with a little cash. The more I keep writing the more ideas I get to use them! I better get going and make some more!
Halloween Sandwiches
 Hello! Seems like everyone is making these mint patty sandwiches so of course I had to try them too. Basically you just stamp, punch, and adhere to each side of the patty. These would be fun to bring to a class at school, for a party, or have ready for " trick or treaters. " They were fun to make and went together in a snap!
Card club tonight
Guess what day it is? Card club! Every second Tuesday of the month a bunch of us get together to make cards. We take turns bringing a "shoebox" with all the ingredients to make a card {for about 20-25 people} inside. We make 5 cards and pay each person who brought a shoebox a dollar for the card. It is so much fun as you never know what you will be making and you get lots of ideas from others. It is my turn to bring a shoebox. Check back tomorrow or the next day and I should have all 5 cards we made posted for you to see!
Monday Night Football
 So what did you have to eat for Monday Night Football? I don't really watch but my hubby likes to have someone to hear his yelling {so I was on the computer with one eye on the TV to show my support.} I made this super simple chili. Last year around deer hunting season I was at Wally's and they were passing out samples of this chili for an easy idea for hunters. It was great and best of all, has only 3 ingredients and takes about 20 minutes. I hardly ever make any other recipe for chili anymore. Here it is:
Easy Chilli
1 pound lean hamburger,browned
1 16oz. can Bush baked beans
1 15oz. can Hunts seasoned diced
tomato sauce for chili
Mix altogether and heat!
Chip board coaster calendar
 Good Morning! I decided to try to make a calendar with some coasters I have. I've seen several ways to make them. For this I used 2 coasters. I attached some SU designer paper to one side of both coasters and sanded the edges. I ran some purely pom stitched ribbon across the front coaster. I punched holes with my cropadile at the top and inserted snaps. Then I used ribbon to tie the two coasters together. I ran off some 2009 calendars from http://www.red-castle.com/software/fw/printcal.htm cut them and attached them to some purely pomegranate paper with brads and adhered it to the coaster. I stamped a swirl on the January calendar page with purely pom ink. I think they will make nice stocking stuffers!
I just ordered some more from http://eclecticpaperie.com/ for only .89 for a pack of ten.I also ordered some round coasters this time. Not quite sure what I'll do with them, but I'll find something! Have a great day!
3x3 sunflower note card
 Hello! This color combo is really striking but its hard to tell from this photo. The note card is made with chocolate chip paper, the flowers with so saffron, and the leaves with old olive. I saw a 3x3 note card made by Jill Hilliard using the scalloped circle punch and circle punch for the sunflower and knew I had to make one! The sentiment is punched with the word window punch. I have been busy moving into my new craft space this weekend! I was in the corner of our guest bedroom but for some reason {hehe} I keep getting more and more stuff! My hubby is having a credenza made for our bedroom nook and moving his home office into there. I get HIS office! It has lots of storage space and room for me to spread out more. It's not large enough for an extra table though, which I really would like. But it will work great for me! When we get everything done I will post some photos. Storing ribbon and cuttlebug folders are a problem for me. My system now is not really working well. I'll be trying out some storage ideas I have seen on other blogs and let you know what I come up with. Have a great Sunday!
Post It note box from Peg
 Guess where I got this Christmas clippie and post it note pad box? My friend Peg wanted to borrow my tab punch for a project she's doing and when she returned it, she gave me this! She's still busy making things for her church bazaar in Iowa. She made a ton of Hershey bar pockets and bag- in -a -boxes, and now she's making these. She used her cricut for the candy canes. Maybe I need to borrow a Christmas cartridge from someone! {hint,hint} I'll try to find the directions for these boxes and post it here later!
Water color flower cans
 Hi! I have been trying out my SU watercolor crayons. I have the rich regals set. I find it difficult to do and I need to practice alot more. But here they are! I started with water color paper and stamped the water can {from angel company}with black stazon. You need to use the stazon or the color will bleed all over the place. Then I colored with the crayons and used the aqua painter. I used bashful blue and real red paper for the first one. The second one I used bashful blue, so saffron, and regal rose. I also used the slit punch and 2 silver brads to finish the card. I'm not sure I will get the other sets of crayons or not. Maybe if I get better at it, but for now I'll just keep practicing!
Cuttlebug 3x3 note cards
 Good Morning! I can't stop making 3x3 note cards. Here are some more I threw together. I dug out my cuttlebug for these. I have some different color combos going on. For the first one I used certainly celery, regal rose, chocolate chip, and white. Then I added chocolate chip ribbon, some brads, and tied some certainly celery ribbon onto that. The embossing folder says "Thank You." The next one starts with bashful blue paper, some certainly celery and white. No ribbon on this one, just a silver brad. I used bashful blue ink on the flower stamp from SU retired set, Love It. The embossed sentiment says"best wishes." The last card has regal rose,certainly celery, so saffron, and bashful blue paper. I used some bashful blue ribbon and 2 white brads. I really like the look of using the slit punch to tuck paper into the slits and then add the brads. I embossed a flower on the bashful blue paper. What you can't see is on the inside white piece I embossed the sentiment "Happy Birthday." I embossed the flap of the envelope with a flower folder, too. I like to tuck the note cards in with gifts. I usually take 3 cards with 3 envelopes and tie them together with some ribbon. The problem is when I give them away the people I give them too don't want to use them! They think they are to cute to use. I keep telling them I'll make 'em more!
Happy Reunion


Last nite we had to bring our little pal Zoe back to our daughter! We were dog sitting for 10 days while she and her boyfriend went to visit his family. As you can see from the smiling face she was VERY happy to get her back! Brent and I on the other hand will miss our little buddy. The other photo shows where she sat while I blogged everynite. I guess its back to the 2 of us again!
Subscribe to:
Posts (Atom)